Freitag, 9. März 2012

Lazy man's way to track user logon/logoff

I always like to find easy ways to do things. Mick recently shared in the public newsgroup how he maintains a log file of user's logons and logoffs.

Step 1: Create the following two files using Notepad or your favorite text editor:

------logon.cmd----
echo logon %username% %computername% %date% %time% >> \\sbs\share\logon.log

-----logoff.cmd-----
echo logoff %username% %computername% %date% %time% >> \\sbs\share\logon.log

Step 2: Update Group Policy to run the appropriate batch file. In Group Policy, go to:
User Configuration-> Windows Settings-> Scripts (Logon/Logoff)-> Logon

Step 3: As users log on and off, your log file should look something like this:

logon June VSXP Tue 22/02/2005 10:39:51.12
logoff June VSXP Tue 22/02/2005 10:41:08.45
logon MickM VSXP Tue 22/02/2005 10:42:01.07
logoff MickM VSXP Tue 22/02/2005 10:42:46.81
Sonntag, 4. März 2012

So installieren Sie PHP 5 auf einem IIS Webserver (Kurzanleitung)

Weblication® Konfigurationshilfe bzw. Kurzanleitung für PHP 5 auf einem IIS Webserver

1. Installieren Sie die aktuelle PHP 5 Version, die Sie über PHP.NET
herunterladen können (siehe weiterführende Links).
Empfehlung: PHP ISAPI (z.B. wegen Performance besser als CGI Version)

2. Erweitern Sie die Windows Pfadvariable um den Pfad zu Ihrem PHP

Verzeichnis.

3. Kopieren Sie den folgenden Quelltext über einen Texteditor, (z. B. Notepad) in

eine Datei (z. B. root.php) im PHP Verzeichnis.

//php 5
$pathInfo = $_SERVER["ORIG_PATH_INFO"];
$pathTranslated = $_SERVER["ORIG_PATH_TRANSLATED"];
$pathInfo = preg_replace("/\//", "\/", $pathInfo);
$pathTranslated = str_replace("\\", "/", $pathTranslated);
$_SERVER["DOCUMENT_ROOT"] = preg_replace("/$pathInfo/i", "", $pathTranslated);
?>


4. Ergänzen bzw. ändern Sie in der PHP.INI die folgenden Einträge. Wenn diese bereits vorhanden sind, ändern Sie die Einträge entsprechend ab. Ändern Sie den Pfad der root.php gegebenenfalls auf Ihre

Umgebung ab.

Meist ist es erforderlich, auch die Angaben zum upload_tmp_dir und session.save_path abzuändern, da diese nach einer Installation unverständlicherweise auf die Pfadangaben des aktuellen Windows-Benutzers gesetzt werden. Die Verzeichnisse, die Sie hier angeben, müssen bestehen, bzw. neu angelegt werden (Pfade auf Ihre Umgebung anpassen).

extension_dir = "./ext"

auto_prepend_file = c:\php\root.php
auto_append_file =

; evtl. Pfadanpassungen wie oben beschrieben, z.B.:
upload_tmp_dir="E:\PHP\uploadtemp"
session.save_path="E:\PHP\sessiontemp"

(Name und Pfad zur "root.php" sind frei wählbar!)

5. Aktivieren Sie die gewünschten PHP Erweiterungen in der PHP Konfiguration (php.ini),

z. B.:
extension=php_curl.dll
extension=php_gd2.dll
extension=php_mbstring.dll
extension=php_mysql.dll
extension=php_pdo.dll
extension=php_pdo_mysql.dll
extension=php_xmlrpc.dll
extension=php_xsl.dll
extension_dir="E:\PHP\ext"

6. Starten Sie den IIS Webserver neu!
Hinweis zur Installation von PHP 5.2.6
Die PHP Version 5.2.3 für Windows enthält sowohl in der gezippten, als auch in der Installer Version fehlerhafte DLLs, die dazu führen, dass PHP Aufrufe mit einer weißen Seite beantwortet werden. Der Fehler tritt unabhängig davon auf, ob die DLLs in der PHP.INI freigeschaltet sind oder nicht.

Um diesen Fehler zu vermeiden, installieren Sie PHP zunächst mit allen DLLs. Verschieben Sie aber anschließend alle DLLs aus dem Ordner ~/ext (z.B. C:\PHP\ext) in einen temporären Ordner, um anschließend nur die DLLS wieder zurückzulegen, die Sie tatsächlich benötigen. Schalten Sie diese in der PHP.INI frei.

Die Beispielkonfiguration geht derzeit von folgenden DLLs im ext-Verzeichnis aus, die auch über die php.ini aktiviert sind:
php_curl.dll
php_gd2.dll
php_mysql.dll
php_xsl.dll

Nach jeder Änderung in der PHP.INI muss der Webserver neu gestartet werden!

Dienstag, 14. Februar 2012

vmware view install ubuntu 11,10

VMware View Client for Linux Tech Preview turns your Ubuntu PC into a thin client and connects to your company’s Virtual Desktop Infrastructure. With VMware View 5 PCoIP capacities you can deliver a personalized high fidelity experience for end-users across sessions, devices and operating systems.

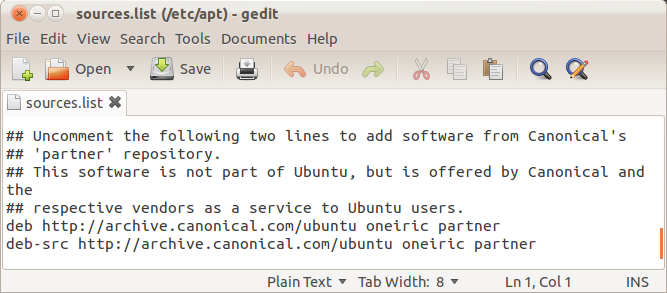
Enable Ubuntu 11.10 partner channel package repository “oneiric-partner”

1$ sudo gedit /etc/apt/sources.list
2[sudo] password for divyen:

Uncomment (take out #) following lines from /etc/apt/sources.list and save file.

2# deb-src http://archive.canonical.com/ubuntu oneiric partner

Retrive new list of packages and install vmware-view-client package.

1$ sudo apt-get update
2$ sudo apt-get install vmware-view-client

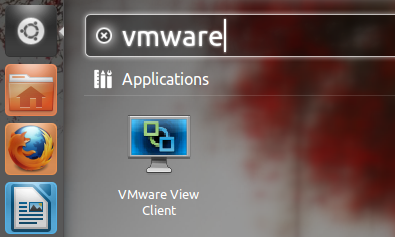
Search and Launch VMware View Client from Dash home

Read more about PC Repurposing with VMware View
http://communities.vmware.com/community/vmtn/desktop/view/pcrepurposing

Fixes

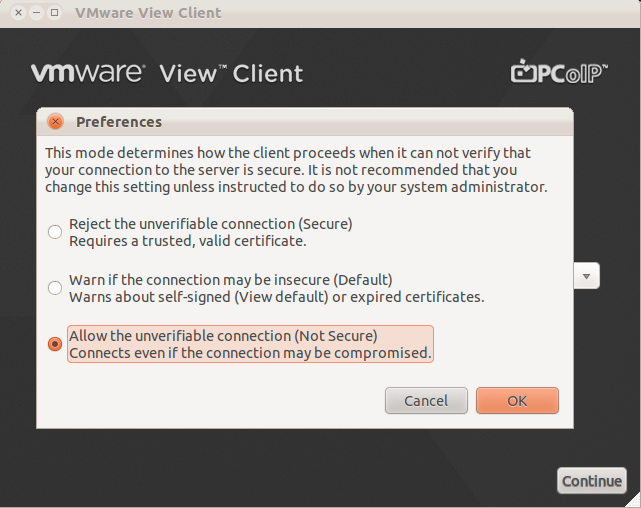
When VMware view Client cannot verify that the connection to the server is secure, it warns about self-signed or expired certificate with this error “The certificate authority is invalid or incorrect”.

If you encounter this error and cannot connect to the virtual desktop, you can go to the File -> Preferences and set the mode which allows the unverifiable connection.

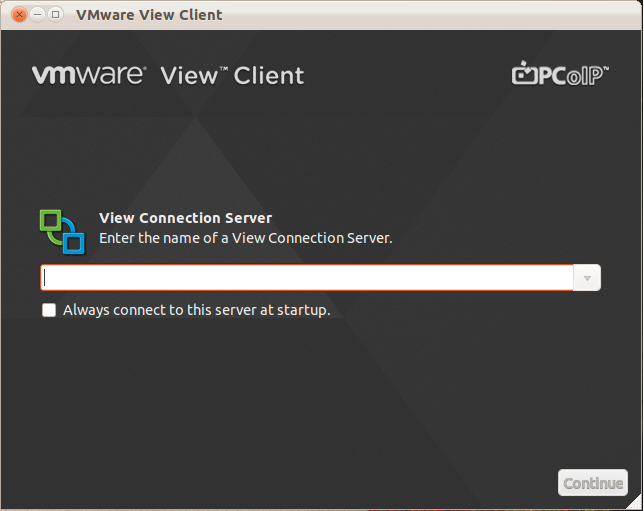
Snapshot of the VMware View Client Connected to the Windows 7 Virtual Machine on Ubuntu 11.10

Freitag, 10. Februar 2012

Backup - RMAN

I. Create a catalog
II. Register a database
III. Un-register a database
IV. Reset the catalog after a restlogs on the target
V. Resync the catalog with the target controlfile
VI. Delete a backup
VII. Backup a database
VIII. Restore/recover a database
IX. Show the controlfile backup record
X. Misc commands

Create a catalog
create a tablespace
create a user
grant connect, resource, recovery_catalog_owner to user;

rman catalog user/pass@db
create catalog tablespace "
";

Note.
is case sensitive (i.e. it must be uppercase)

Note. If you get the error 'rman: can't open catalog', make sure that oracle's rman is being run (which rman). X11 also has a command called rman. Rename it if necessary.
Register a database
Note. ensure the target db has a password file
rman catalog user/pass@rmandb target user/pass@db

register database


Un-register a database
sqlplus user/pass@rmandb
select * from rc_database;
select db_key, db_id from db;

execute dbms_rcvcat.unregisterdatabase(
, );


Reset the catalog after a restlogs on the target
reset database;


Resync the catalog with the target controlfile
resync catalog;


Delete a backup
allocate channel...
delete backuppiece
;
release channel;


Backup a database
backup database plus archivelog format '/u01/ora_backup/rman/%d_%u_%s';

run {
allocate channel t1 type disk;
backup current controlfile format '/u01/ora_backup/rman/%d_%u_%s';
backup database format '/u01/ora_backup/rman/%d_%u_%s';
backup archivelog all delete input format '/u01/ora_backup/rman/arch_%d_%u_%s';
release channel t1;
}

run {
allocate channel t1 type disk;
backup archivelog all delete input format '/u01/ora_backup/rman/arch_%d_%u_%s';
release channel t1;
}
Cold backup (archivelog or noarchivelog mode)
run {
allocate channel t1 type disk;
shutdown immediate;
startup mount;
backup database include current controlfile format '/u01/ora_backup/rman/%d_%u_%s';
alter database open;
}

run {
allocate channel t1 type disk;
backup archivelog all delete input;
}


Restore/recover a database
Full restore and recovery
startup nomount;
run {
allocate channel t1 type disk;
allocate channel t2 type disk;
allocate channel t3 type disk;
allocate channel t4 type disk;
restore controlfile;
restore archivelog all;
alter database mount;
restore database;
recover database;
}
sql 'alter database open resetlogs';
Restore and roll forward to a point in time
startup nomount;
run {
set until time ="to_date('30/08/2006 12:00','dd/mm/yyyy hh24:mi')";
allocate channel t1 type disk;
allocate channel t2 type disk;
allocate channel t3 type disk;
allocate channel t4 type disk;
restore controlfile;
restore archivelog all;
alter database mount;
restore database;
recover database;
}
sql 'alter database open resetlogs';

If the archive logs are already in place:

startup mount;
run {
set until time ="to_date('08/02/2007 14:00','dd/mm/yyyy hh24:mi')";
allocate channel t1 type disk;
allocate channel t2 type disk;
allocate channel t3 type disk;
allocate channel t4 type disk;
restore database;
recover database;
}
sql 'alter database open resetlogs';

startup mount;
run {
allocate channel t1 type disk;
recover database;
}


Show the controlfile backup record
set pages 999 lines 100
col name format a60
break on set_stamp skip 1
select set_stamp
, to_char(ba.completion_time, 'HH24:MI DD/MM/YY') finish_time
, df.name
from v$datafile df
, v$backup_datafile ba
where df.file# = ba.file#
and ba.file# != 0
order by set_stamp, ba.file#
/


Misc commands
list backupset;
list backup of database;
list backup of archivelog all;
report obsolete;
report obsolete redundancy = 2;
delete obsolete; - remove unneeded backups
restore database validate; - check the backup
report unrecoverable;
report schema; - show current db files
crosscheck backup; - make sure the backups in the catalog still physically exist
delete expired backup; - delete epired backups found by crosscheck
rman target sys/*****@scr10 catalog rman/rman@dbarep
LIST BACKUPSET OF DATABASE;
ALLOCATE CHANNEL FOR MAINTENANCE DEVICE TYPE DISK;
DELETE OBSOLETE REDUNDANCY = 4 device type disk;
delete obsolete REDUNDANCY = 2 device type disk;
Delete archive log older than...
DELETE NOPROMPT ARCHIVELOG UNTIL TIME "SYSDATE-5"
Crosscheck the available archivelogs (fixes RMAN-06059)
change archivelog all crosscheck;


Samstag, 28. Januar 2012

Install gimp 2.7.3 (ubuntu 11.10)

Launchpad PPA named mrw-gimp-svn for matthaeus123

sudo apt-add-repository ppa:matthaeus123/mrw-gimp-svn

sudo apt
-get update

sudo apt
-get install gimp

Freitag, 20. Januar 2012

Install SSL vmware view 5 (Windows Domain)

1. Create the certificate keystore on the view server

- Add C:\Program Files\VMware\VMware View\Server\jre\bin to PATH
- At cmd prompt run cd "c:\program files\vmware\vmware view\server\sslgateway\conf"
- keytool -genkey -keyalg "RSA" -keystore keystorefilename.p12 -storetype pkcs12 -validity days
- Provide and confirm a keystore password when prompted (this will be stored in clear text later by the way)
- You will then get prompted for your first and last name. Use the servername.domainname. Answer the other questions if you want.
- Type yes to confirm

2. Create the CSR request

- keytool -certreq -keyalg "RSA" -file csrfilename.csr -keystore keystorefilename.p12 -storetype pkcs12
- Use password from keystore creation

3. Submit CSR request to Windows CA

- Open IE and go to your CAs certificate request page
- Request advanced cert
- Submit a certificate request
- Copy and paste content of csrfilename.csr file
- Cert template: Web
- Additional attributes san:dns=blah&dns=blah.domainname&dns=ip (must've already run editflag command on CA server for this to wor as per my last post)
- Save the Base64chain p7b file to c:\program files\vmware\vmware view\server\sslgateway\conf

4. Import certificate chain into keystore

- keytool -import -keystore keystorefilename.p12 -storetype pkcs12 -keyalg "RSA" -trustcacerts -file base64chain.p7b
- At prompt type yes

You then need to edit/create "locked.properties" text file in c:\program files\vmware\vmware view\server\sslgateway\conf which contains 2 lines:
keyfile=keystorefilename.p12
keypass=keystorepass

5. Reboot (VM says that restarting VM view web services should do but I haven't had that work but it might for you)


Donnerstag, 19. Januar 2012

Erstellen eines SSL Zertifikats für einen Linux/UNIX Host mithilfe einer Windows Zertifizierungsstelle (CA oder Certification Authority)

Dieser Artikel beschreibt die Erstellung eines SSL Zertifikats für einen LINUX/UNIX Host mithilfe von openssl durch eine Windows Zertifizierungsstelle (CA oder Certification Authority).

LINUX/UNIX Host

Zunächst wird mithilfe von openssl ein Serverschlüssel erstellt. openssl genrsa –des3 –out server.key 1024

Anschließend sollte der Schlüssel mit der folgenden Befehlssequenz geprüft werden: openssl rsa -noout -text -in server.key

Mit dem folgenden Befehl wird ein CSR erstellt. openssl req -new -key server.key -out server.csr

und anschließend geprüft: openssl req -noout -text -in server.csr

Nach erfolgreicher Prüfung geben wir das base64-encoded csr aus und kopieren die Ausgabe in die Windows Zwischenablage: openssl req -in server.csr

-----BEGIN CERTIFICATE REQUEST-----
MIIBujCCASJKC834J9fjsdkejsdfs43VMxFzAVBgNVBAgTDk5vcnRoIE
...
hYqNb098vxzcmeFWvk=
-----END CERTIFICATE REQUEST-----


Windows 2003 Server
Öffnen Sie im Internet Explorer die folgende URL: http://Zertifikats-Server/certsrv

1.Wählen Sie Ein Zertifikat anfordern, Drücken Sie auf Weiter

2.Wählen Sie Erweiterte Anforderung, Drücken Sie auf Weiter
3.Wählen Sie Reichen Sie eine Zertifikatanforderung ein, die eine Base64-codierte CMD- oder PKCS #10-Datei verwendet, oder eine Erneuerungsanforderung, die eine Base64-codierte PKCS #7-Datei verwendet., Drücken Sie auf Weiter
4.Kopieren Sie das Base64 CSR aus der Zwischenablage in das Textfeld Base64-codierte Zertifikatsanforderung (PKCS #10 or #7)
5.Wählen Sie in dem Kombinationsfeld Zertifikatsvorlage WebServer aus.
6.Drücken Sie auf Senden
7.Schließen Sie den Internet Explorer.

Öffnen Sie die Microsoft Management Console über Start->Ausführen und führen Sie den folgenden Befehl aus: mmc
1.Fügen Sie das Snap-In Zertifizierungsstelle hinzu.
2.Weisen Sie das Ausstehende Zertifikat zu.

Öffnen Sie die URL: http://Zertifikats-Server/certsrv
1.Wählen Sie Status ausstehender Zertifikate anzeigen
2.Wählen Sie das ausgestellte Zertifikat aus, Drücken Sie auf Weiter
3.Wählen Sie Base 64 codiert aus und Laden Sie das Zertifikat herunter.
4.Kopieren Sie das heruntergeladene Zertifikat auf den LINUX/UNIX Host.